









1.Start up
1.1 Checking
Please carefully check if there is any damage or collision to the equipment.
1.2 Wiring

Connect the external power supply correctly, and ensure that the wiring is correct and error free, including the power line, magnetic grating signal line, and foot pedal line.
1.3 Install
1.3.1 Magnetic scale: The same model as the magnetic grating ruler of the bending machine can be directly connected in parallel, and a bracket connection needs to be made for different models.


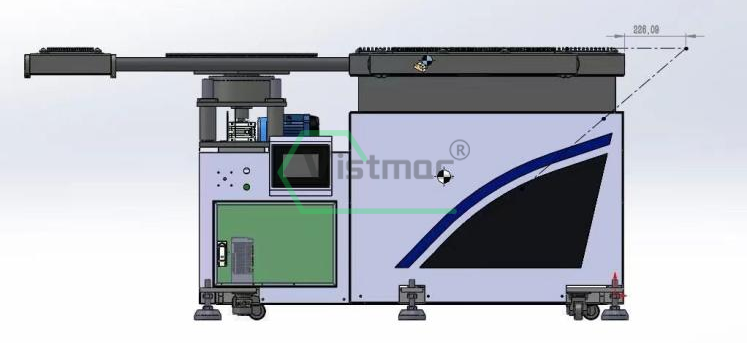
1.3.1 Follower car: The edge of the follower car platform is within a range of 226-230mm from the center of the press brake mold, and the platform surface is 1-3mm lower than the lower mold of the bending machine. (Single axis handwheel adjustment, dual axis system setting)

1.4 Power on
Turn on the power switch of the follower car. Subsequently, the touch screen will display normally. When the welcome interface appears, it indicates that the system has started up normally. At this time, you can press the device image to enter the operation interface.

2.Counting direction proofreading
The bending machine and the follower car are started simultaneously, and the sliding block of the bending machine is operated to move downwards. At this time, the number displayed under the "bending machine tool position" of the follower car should increase. If there is a decrease, the electrical cabinet should be opened. Find the block shown in Figure 1-2, exchange the wire numbers X0.2 and X0.3 above, and check again.

Figure 1-1

Figure 1-2
3.Screen Description
3.1 Main Screen
Press the "Main Screen" button to enter the main Screen.

Button and display instructions

:Manual and automatic switch button;

:Follower car R-axis and Z-axis return to origin button;

:Bending machine slider position display and position correction button;

:Display of R-axis and Z-axis positions of the follower car;

:Correction of clamping point and bending machine pressing depth;

:Bending machine speed setting;

:Setting the height and bending angle of the follower car;

:Multi angle (multi-step) bending setting;

:Clear alarm after alarm.
3.2 Program Call Screen
Press the "Program Call" button to enter the program call.

Button Description

:Program saving and calling.
3.3 manual screen
Press the "Manual Screen" button to enter the manual screen.

Button and display instructions

:Flip axis (R-axis) position display;

:Display of lifting axis (Z-axis) position;

:Flip axis (R-axis) manual up and down flipping;

:Manual lifting and lowering of the Z-axis.
3.4 Parameter settings screen
Press the "Parameter Settings" button to enter the parameter screen.

Button and display instructions
ØR-axis return to origin high-speed:Speed when searching for reference point on the R-axis;
ØR-axis return to origin at low speed:The speed at which the R-axis reaches the specified position after searching for a reference point;
ØR-axis origin offset:When the displayed position on the R-axis is inconsistent with the actual position, position correction is required;
ØR-axis manual acceleration and deceleration:In manual mode, the acceleration and deceleration time of the R-axis;
ØR-axis positive limit:Limit the maximum flipping angle of the R-axis during normal operation;
ØR-axis negative limit:During normal operation, limit the minimum flipping angle of the R-axis;
ØR-axis flipping down quickly:In automatic mode, the return speed of the R-axis;
ØR-axis automatic acceleration:In automatic mode, R-axis acceleration time;
ØR-axis automatic deceleration:In automatic mode, R-axis deceleration time;
ØR-axis downward flipping angle:In automatic mode, the return angle of the R-axis;
ØZ-axis return to origin high-speed:Speed when searching for a reference point on the Z-axis;
ØZ-axis return to origin at low speed:The speed at which the Z-axis reaches the specified position after searching for a reference point;
ØZ-axis origin offset:When the displayed position on the Z-axis is inconsistent with the actual position, correct the position;
ØZ-axis manual acceleration and deceleration:In manual mode, Z-axis acceleration and deceleration time;
ØZ-axis positive limit:During normal operation, limit the highest position of the R-axis;
ØZ-axis negative limit:During normal operation, limit the lowest position of the R-axis;
ØZ-axis fast lifting and lowering:In automatic mode, the Z-axis lifting speed;
ØZ-axis automatic acceleration:In automatic mode, Z-axis acceleration time;
ØZ-axis automatic deceleration:In automatic mode, Z-axis deceleration time;
ØZ-axis lifting starting point:In automatic mode, the Z-axis lifting starting point;

:In automatic mode, when the bending machine slider stops, the follower car also stops. After closing, the follow-up car receives a clamping point signal and runs to the target value without being affected by the slider stop.
3.5 IO monitoring
Press the "IO Monitoring" button to enter the IO monitoring interface: PLC input and output monitoring, facilitating equipment software and hardware maintenance and troubleshooting.

3.6 Alarm
Press "Alarm screen" to enter the alarm screen: device alarm record, convenient for equipment maintenance and troubleshooting.

4.Operate
4.1 origin
The bending machine and the follower car start up simultaneously, operate the bending machine back to the reference point, and keep the bending machine at the origin position. The follower car is in manual mode on the "main screen",

Press
and hold the (long press for 1 second) bending machine slider position return to zero and
R/Z axis return to zero buttons. At this time,
the position of the bending machine slider、
The R-axis and Z-axis display values have changed to 0.
Note: The spindle zeroing operation can only be performed after the bending machine is first turned on and the parameter search is completed.
4.2 Calibration and Procedures
4.2.1Operate the bending machine to the clamping point position and maintain it at the clamping point position (the bending angle of the bending machine is set to 180 degrees, the holding time is set to 5 seconds, and the bending machine is operated and stopped at the clamping point), and follower car in manual mode on the "main screen".
,Press
and hold for 1 second to correct the clamping point, and the displayed value after correction will be the same as the position value of the bending machine slider at this time.
4.2.2Operate the bending machine to the clamping point position and maintain it at the clamping point position (the bending angle of the bending machine is set to 90 degrees, the holding time is set to 5 seconds, and the bending machine is operated and stopped at the clamping point). the manual mode of the follower car on the "main interface"
,Press
and hold for 1 second to calibrate the end point of the bending machine. After calibration, the displayed value will be the same as the position value of the bending machine slider at this time.
4.2.3
Bending machine speed setting: Simultaneously set the bending speed of the bending machine and the follower car. It is recommended to set the bending machine and follower car speeds below 5mm/s.
4.2.4

:The bending angle and platform position are set. The bending angle is the forming angle of the bent workpiece, and the bending position is the platform height position (used when the bending machine uses combination molds or reverse cutting to avoid collision).
4.2.5
:Multi step programming is used when the workpiece has multiple angles or when using a combination mold, and the program can also be saved and called.
4.3 Automatic
Return the bending machine to the top dead center position and switch to automatic mode with the follower car

.At this point, control the bending machine to start bending, and when it reaches the clamping point position, the follower car starts to follow. When the bending end point is reached, the follower car reaches the follow-up position. In general, the follower car start will be slower than the flipping of the bent sheet metal. At this time, the follower car switches to automatic mode

Modify clamping point values
:Reduce the current value by 0.8-1 and try again to achieve a follow-up effect.
5.Points for attention
1、When working , personnel are prohibited from standing behind.
2、When working , personnel are prohibited from opening the equipment and entering all parts of the body inside the equipment.
3、When changing the program, please return the bending machine to the top dead center and switch to manual mode with the follower car
.
4、In automatic mode
, if the follower car, does not follow , or if the follow-up position or return position is not in place, Please switch to manual mode
and contact our after-sales service personnel in a timely manner to resolve the issue and resume production.