








1. Overview
This manual covers the basic installation, factory setting, operation and maintenance services of SUP series 23T model.
SUP23T Four-in-one hand welding head is a new super great application in handheld laser welding, non-contact welding, welding cleaning, cutting field of single motor scanning swing welding head —— hereinafter referred to as SUP23T. The product includes a handheld laser head and its control system, and has multiple safety alarms and active safety light break settings. It is developed on the basis of the SUP20T handheld laser head which has been mass produced by our company.
Compared with the previous generation, it is further improved in insulation, stability, maintenance and other aspects, and has the characteristics of more compact, lighter and more reliable.
The product can be adapted to various brands of fiber lasers, optimized optical and water cooling design so that the laser head can work stably for a long time at 3000W, and the cleaning width of switching cleaning mode is up to 120mm.
update log
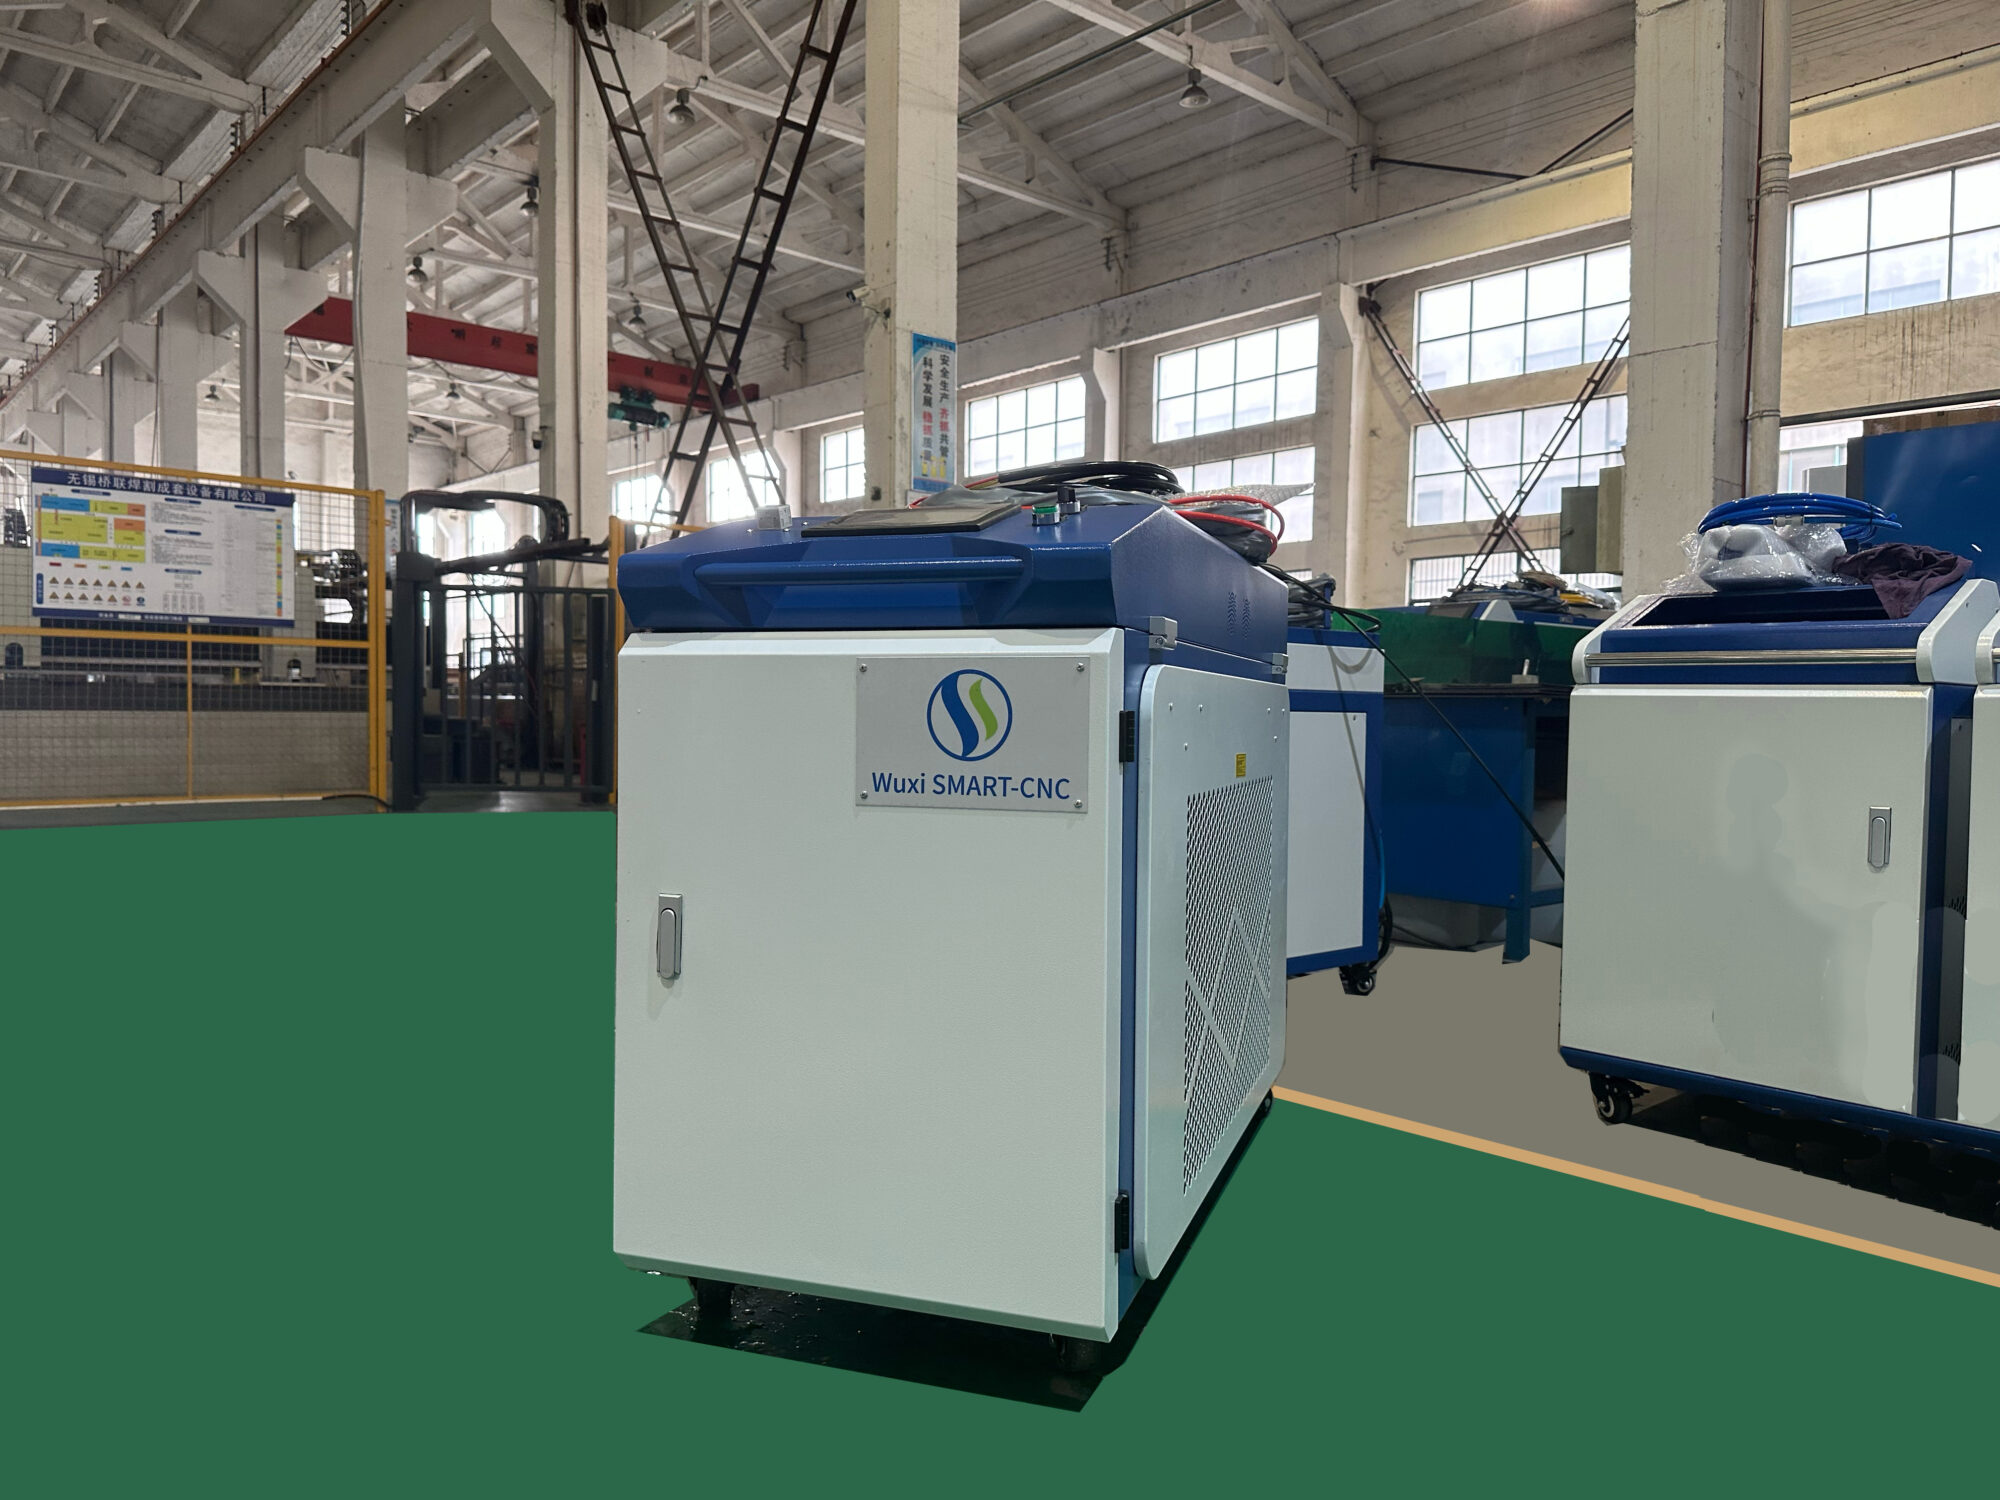
Laser welding Machine
Refresh time | Update content | Edition |
|---|---|---|
In June 23 | The system adds the process library and changes the speed function of the wire feeder | V5.8-803-803 |
Cell | Cell | Cell |

Figure 1. 1 Schematic diagram of the SUP-23T welding head
Product features:
Basic features of the product: self-developed control system and structural design, adapt to various welding requirements within 3000W, set multiple safety alarms and state indicator lights, abnormal state instantaneous response. The net weight of 750k is flexible and easy to use.
The whole machine is more stable: all parameters can be seen, monitor the state of the whole machine in real time, avoid problems in advance, facilitate troubleshooting and troubleshooting, and ensure the stable operation of the hand-held welding head.
Subversion structure design: the main structure integrated design and processing, greatly reduce the failure rate, and facilitate the later maintenance.
Controlled parameters and high repeatability. Stable nozzle pressure and lens state, only as the laser power is stable, the process parameters must be repeated, save the adjustment time, improve the work efficiency.
1.1 operating environment and the parameters
As shown in Table 1.1, the operating environment requirements and main parameters of SUP23T:
Table 1. 1 Operating Environment Requirements and Main Parameters
Switch power supply input voltage (V) | 220V±10% AC 50/60Hz |
Put the environment | Flat, with no vibration or impact |
Working environment temperature: (℃) | 10~40℃ |
Working environment humidity: (%) | ≤70% |
cooling-down method | hydro cooling |
Applicable wavelengths (nm) | 1064nm(±10nm) |
Applicable power (W) | ≤3000W |
Collimator Specification (mm) | D16-F60 |
Focus mirror size (mm) | D20-F150 |
Protective mirror size (mm) | D18xT2 |
Gun body air pressure (Bar) | ≤15Bar |
Focus vertical adjustment range (mm) | ±10mm |
Scan width-Welding (mm) | 0~8mm |
Scan width-Wash (mm) | F150-0~30mm |
F400-0~60mm | |
F800-0~120mm | |
weight (kg) | 0.7kg |
1.2 pay attention to information
(1) Ensure reliable grounding before power supply.
(2) The laser output head is connected with the hand-held laser head through QBH, please carefully check the laser output head to prevent dust or other pollution. Please use special lens paper when cleaning the laser output head.
(3) If the equipment is not used according to the method specified in the manual, it may be in an abnormal working state and cause damage.
(4) When replacing the protective mirror, please ensure good protection.
(5) Please note: for the first time, when the red light can not come out of the copper mouth, be sure not to shine.
(6) State indication: the gun body [state indicator light] is ①, red flashing indicates that the —— water cooler alarm, laser alarm, air pressure alarm, can not shine at this time.②, The red light indicates that the —— protection mirror over
temperature alarm, the motor driver over temperature alarm, at this time, the equipment is in an abnormal state can not be forced out of the light, should be stopped for inspection.
2. Installation and connection
2.1controllerinterfacedefinition
Hand-held laser head controller interface definition as shown in Table 2. 1:
Table 2. 1 Definition of the controller interface
plug | definition | Signal type | function declaration | |
|---|---|---|---|---|
source | 1 | -15V | import | V2 connected to the ± 15V switch power supply to provide the-15V power supply voltage |
2 | GND | To refer to | Any COM connected to the ± 15V open power supply | |
3 | +15V | import | V1 connected to ± 15V switching power supply provides + 15V power supply voltage | |
4 | GND | To refer to | A-V connected to the 24V switch power supply | |
5 | +24V | import | A + V connected to the 24V switching power supply | |
LCD | 1 | G | To refer to | Power to |
2 | R | transmit ting terminal | Data direction: the controller LCD screen | |
3 | T | receiving terminal | Data direction: the LCD screen controller | |
4 | V | output | Provide 24V power supply for the LCD screen | |
Signal interface 1 | 1 | GND | To refer to | Signal ground |
2 | Air pressure alarm signal | import | Air valve alarm. The setting page can set the polarity of the alarm signal and the low level alarm when not in use | |
3 | GND | To refer to | Signal ground | |
4 | Water-cooler alarm signal | import | Connect water cooler alarm. The setting page can set the polarity of the alarm signal and the low level alarm when not in use | |
5 | Safety ground lock reference place | Isolation | When connecting the metal clip, the system does not make the judgment, and the foot is suspended | |
6 | Safety lock | import | Seven-core wire-blue wire (upper mark safety lock) -in cleaning mode, the system does not make a judgment, this foot is suspended | |
7 | Welding head light switch 1 | import | Seven-core-black line (marked light switch 1) | |
8 | Welding head light switch 2 | import | Seven-core-black line (marked light switch 2) | |
Signal interface 2 | 1 | Temperature measurement 1 | import | Seven-core line-yellow line (upper standard temperature measurement 1) With seven core line-green line (upper standard GND) after GND formation circuit |
2 | Temperature measurement 2 | import | Seven-core line-red line (upper standard temperature measurement 2) The seven-core wire-white wire (upper standard GND) is connected to GND | |
3 | Protection Gas Valve- | To refer to | Signal ground (reference ground of 2 / 4 feet) | |
4 | Protection Gas Valve+ | output | Air valve opening: output 24V; Valve shutdown: no output. | |
5 | wire feed- | output | Two core wire-brown wire (standard wire-) | |
6 | wire feed+ | output | Two-core wire-blue wire (standard wire +) | |
Signal interface 3 | 1 | Laser abnormal signal | import | Laser device alarm signal |
2 | The laser enables light | output | The enabling signal of the laser device | |
3 | 24V output | output | 24V output, power directly output 24V voltage. | |
4 | GND | To refer to | Reference (foot 1 / 2 / 3 / 5) | |
5 | The 0~10V simulation quantity | output | Analog amount of the connected laser, DA + | |
6 | RF- (PWM-) | output | Laser pulse-width-modulated signal- | |
7 | RF+(PWM+) | output | Laser pulse width modulation signal + | |
2.1.1 power supply terminal of the controller
The power supply end uses 5P interface, with random 24V switching power supply and ± 15V switching power supply.
Please note that the 15V switching power supply distinguishes between positive and negative electrodes, V1 + 15V, V2- 15V, any COM on the 15V switching power supply is connected to the 2 pin GND!
Please note that the switching power supply must be grounded!
2.1.2 The LCD screen terminal of the controller
The LCD screen wiring is randomly attached and connected directly. See Table 2. 1 above for specific definition.
2.1.3 controller signal interface1
Signal interface 1 uses 8P interface and is the input signal interface, and the detailed interface definition is shown in Table 2.2:
Table 2.2 Functional description of the signal interface 1
Signal interface 1 | ||
|---|---|---|
The pin number | Signal definition | function declaration |
1 | GND | The foot is the input port of air pressure alarm signal, and the loop and GND through external alarm are used. In normal conditions, 12V can be measured [high level], and when 1,2 feet are on or 2 feet 3V is [low level]. Please set the [air pressure alarm level-high /low] of the screen setting page combined with the alarm parameters of the air valve. |
2 | Air pressure alarm signal | |
3 | GND | The 4-foot is the input port of the alarm signal of the water cooler. The principle is the same as the air pressure alarm signal. |
4 | Water-cooler alarm signal | |
5 | Safety ground lock reference place | 5 feet to metal clip, 6 feet to blue (mark safety lock) line. During welding, the metal clip and the welding torch copper nozzle are connected through the parts to be processed to connect the 5.6 feet. The system is judged as [safety lock conduction], allowing light. Do not make this judgment when cleaning the mode. |
6 | Safety lock | |
7 | Welding head light switch 1 | 7 feet to black (mark light switch 1) line, 8 feet to brown (mark light switch 2) line. Pull the trigger switch, then 7,8 foot conduction, the system judgment as [light switch conduction], allow light. The Cleaning mode is the same as the welding mode. |
8 | Welding head light switch 2 | |
Note: Only when the system has no alarm and the safety lock and switch signal are displayed in green (turn on). | ||
2.1.4 controller signal interface2
Signal interface 2 uses 6P interface and detailed functional definition is shown in Table 2.3:
Table 2.3 Functional description of the signal interface 2
Signal interface 2 | ||
|---|---|---|
The pin number | Signal definition | function declaration |
1 | Temperature measurement: 1 / status indication | Connect the yellow (upper mark temperature 1 / state indicator) line. At the same time, the white and green (superscript GND) wire is connected to the control box [GND] terminal, which can work normally. |
2 | Temperature measurement 2 | The interface is the same [Temperature measurement 1] |
3 | GND | Air valve outlet, maximum load of 2A. When light, [protection valve] output 24V, and the air valve remains open. When not light, [protection valve +] output 0V, the air valve remains closed. |
4 | Water-cooler alarm signal | |
5 | Safety ground lock reference place | The signal interface of the wire feeding machine is used together with our wire feeding machine. When optical welding, [wire +] and [wire] guide, wire delivery machine wire. |
6 | Safety lock | |
2.1.5 controller signal interface3
The signal interface 3 uses the 7P interface, and the detailed functional definition is shown in Table 2.4:
Table 2.4 Functional description of the signal interface 3
Signal interface 2 | ||
|---|---|---|
The pin number | Signal definition | function declaration |
1 | Laser abnormal signal | To enable (wiring), set the "laser alarm level" of the display setting page with the alarm level of the actual laser. |
2 | The laser enables light | Enabling +, connected to the laser enabling +. |
3 | 24V output | 24V output, the system power directly output 24V voltage. |
4 | GND | Common ground (reference ground for foot 1 / 2 / 3 / 5) |
5 | analog quantity + | Analog output (the default is 0-10 V analog voltage). |
6 | RF- (PWM-) | PWM- modulating signal |
7 | RF + (PWM +) | PWM+ modulating signal |
Click for details: Laser wiring definition logic
2.2Terminalblockdiagramofthecontroller
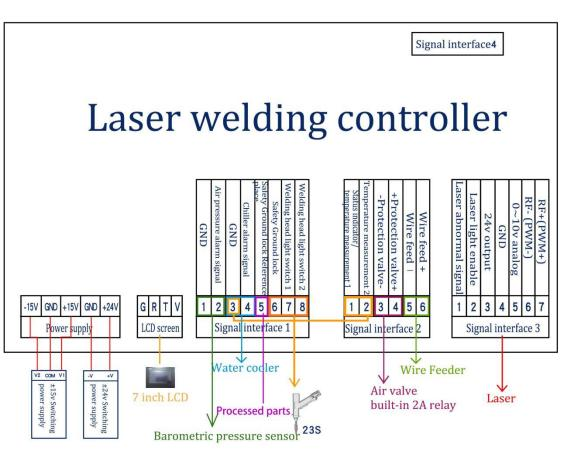
Figure 2. 1 Terminal block diagram of the controller
Note: The ground wire of the switch power supply must be effectively grounded!
Note: Both the ± 15V switching power supply COM end and the + 24V switching power supply-V (0V) end should be connected to the
GND. The switching power supply shell must be connected to the earth, otherwise there may be no light and other abnormalities.
2.3 optical fiber input interface
SUP welding head is suitable for the vast majority of industrial laser generators, commonly used optical fiber joints including IPG, Ruike, Chuangxin, Feibo, Spurs, Jept, Kaplin, etc. The optics must be kept clean, all dust must be removed before use, and the torch head must be placed horizontally to prevent dust from falling into the interface.
method of erection
2.4 protect the gas and the water cooler interface
The water pipe and gas pipe interface can be installed with a hose with outer diameter 6mm inner diameter 4mm. Access and exit pipeline of waterway (regardless of entry and exit direction)
The cooling system is divided into waterway section of welding head and waterway section of optical fiber head connected in series as shown in the following figure:

Figure 2.2 Water route diagram of welding head and optical fiber head
2.5 connecting interface between welding gun and control box
The handheld welding head is connected to the control box through a group of "multi-function system connecting lines". The handheld welding head end is the aviation plug female head, and the control box head end is the aviation plug male head. The seven-core wire connecting gun body controls the light and temperature, and the two-core and five-core wires are the vibrator motor control line.
3. The Control Panel Operating Guide
SUP-23T handheld welding head control panel version number is V5.8-803-803, the version number is subject to the physical picture for reference only.
Supported languages: 19 languages.
simplified Chinese | English | Korean | Russian | traditional Chinese | Japanese | Dervin | French | Italian | Spanish |
Portuguese | Turkish | Greek | Czech wen | Slovak | Polish | Thai | Vietnamese | Romanian text | Cell |
Table 1

Figure 3.0-Language switching
1. Welding mode

Figure 3.1-1, the front page of the control panel
① This interface can see the current process parameters (this page can not be modified process) and real-time alarm information.
② The default is ON, the red light is LINE by default, and the welding mode is continuous. When enabling is turned off, the enabling signal will not be sent to the laser and can be used to test the outlet function. Close the red light indicator, the motor stops swinging, and the red light is a point to adjust the center position. The welding mode is divided into continuous and spot welding. When the spot welding is selected, the spot welding type needs to be set on the setting page.
③ The safety lock is divided into gray and green. When the metal clip is clamped on the processing piece and the copper nozzle of the gun contacts the processing piece, the 5 and 6 feet of the signal interface 1 are connected, and the
safety lock indicator is displayed as green. At this time, the light can be realized according to the trigger.
④ Click on the upper right corner to switch to the cleaning mode.
At present, the process page provides a self-editable [process library] function for users to save the parameters. The definition and scope of the process parameters are introduced below:

Figure 3.1-2.0 Control panel process page
1. Red frame is the welding process parameters
① When the process interface contains the process parameters for debugging, you can click [value box] to modify it. Click [Import] to take effect.
② The scan speed range is 2-6000mm / S, and the scan width range is 0 ^ 6mm. The scan speed is limited by the scan width, which is: 10 scan speed / (scan width * 2) 1000 If the limit is exceeded, it automatically becomes the limit value. When the scan width is set to 0, it does not scan (ie, a point light source)
(Common scanning speed: 300mm / S, width of 2.5-4mm).
③ The peak power should be less than or equal to the laser power of the parameter page (if the laser power is 1000W, this value is not higher than 1000).
④ Duty cycle range 0 to 100 (default 100, usually not changed).
⑤ The pulse frequency range is recommended from 5-5000Hz (default 2000, usually no modification).
⑥ Click the HELP button on the top right to get more relevant parameter explanations.
⑦ After modifying the parameters, the home page parameters become the corresponding value and imported successfully.
⑧ Reference process, can be used in the small program process reference
2、 Yellow box is the [process library] parameter
① When you need to weld a wide weld, click [process library] to switch to [double wire feeder mode], [scan width] range: 0~8mm.
② When calling the process library parameters, click the material such as [stainless steel] and the thickness such as [1.0], the welding parameters of [1.0mm thick stainless steel] are displayed in the red box, and the corresponding wire feeder parameters are displayed in the blue box (if the wire feeder communicates through the signal interface 4, the wire feeder speed will take effect. If not communicated, only as a reference). Click the [Modify icon] on the right side of the thickness value to modify the thickness value.
③ When modifying the process library parameters, directly modify the parameters in the red box, and the data will cover the parameters of the currently selected process group, such as [1.0mm thick stainless steel].
④ When restoring the process library, click [Help] and long press [to restore the factory parameters of the modified process library to the process library set by the factory. Long press [save factory parameters], then the current process library will cover [factory process library]. Please use it carefully.

Figure 3.1-2. 1 Process Help page
3、 Green box are spot weld type parameters
When the home page selects [spot welding], the [spot welding type parameter] appears on the process page. If [continuous] is selected, the process page does not display [spot welding type parameter].
4、 Blue boxes are the parameters of the wire feeder
The wire feeding parameter takes effect when the [signal interface 4] (not the signal interface 2) is connected to the [wire feeder]. Click [wire machine] to enter [complete wire machine interface].

Figure 3.1-2.2 Silk machine page
matters need attention:
① Some lasers cannot emit light with less than 10% power. When the peak power of the process page is less than 10% of the maximum power of the laser on the set page, all output signals are normal, but they may not emit light.
② The duty cycle is 100%, usually does not need to change, when the pulse frequency does not work. If you need to use it, please adjust it according to the actual requirements. Example: Peak power of 300W, duty cycle of 50%, and pulse frequency of 1000Hz. At this time, the light cycle is 1mS,0.5mS to 300W light, 0.5 mS no light, the cycle continues, at this time, the air at the welding burst. The actual situation is based to the laser parameters.
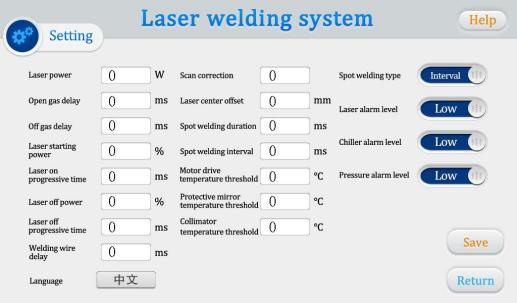
Figure 3.1-3 Control Panel setting page
Click "Settings" on the home page, enter the password 123456 in the password input page of the pop-up window, and then enter the Settings page.
① The laser power is the power of the used laser, please fill in correctly.
② The default air delay default 200ms, range 0 ms to 3000 ms.
③ N1% of process power to 100%; 100%% of process power to N2; (as shown in the figure below):
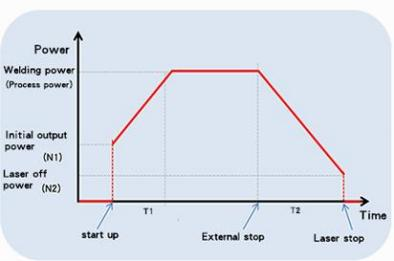
Generally preset switch light power 20%, switch light step time 200ms;
④ Silk delay compensation is the advance time relative to the light signal, which can be used with the withdrawal function, not set by default;
⑤ The maximum value of the three temperature alarm valves is 70℃. When the value is set to 0, the temperature is not detected, and the buzzer alarms when the measured temperature is greater than the set value;
⑥ Scan correction coefficient = target line width / measured line width, range from 0.01 to 4. Generally set to 1;
⑦ Laser center offset-3~3mm, decrease to the left, increase to the right, applied to adjust the red axis light center;
⑧ Air pressure / water cooler / laser alarm level signal is low level, and when this alarm signal is used, the alarm level here should be set to the same with the alarm level of external equipment;
⑨ The spot welding duration is the light output time in each cycle in the spot welding mode, and the spot welding interval time is the light output time in each cycle in the spot welding mode;
⑩ Click on the Help button at the top right to get more relevant parameter explanations.
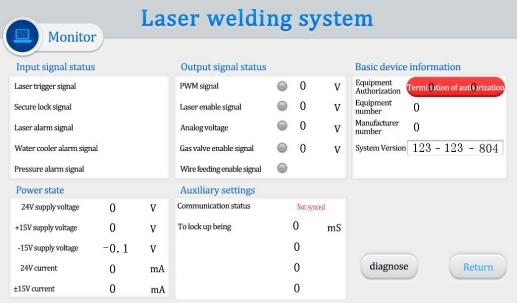
Figure 3.1-5 Monitoring page
This page displays the status of each signal and the equipment information.
① Input signal status
Laser trigger signal: when the user externally controls the 7 and 8 feet of the signal interface 1, this state is changed from gray to green.
Safety lock signal: normal short contact, this state changes from gray to green.
Laser / water cooler / air pressure alarm signal: monitor the real-time level status of these interfaces.
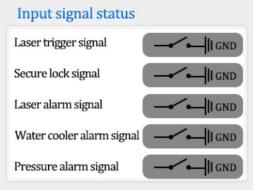
Figure 3.1-6 Monitoring page-Input signal status bar
② Output signal status
When the signal is output, the signal in this area changes immediately and can be directly visualized. The monitoring signal is the circuit signal detected in real time, which will fluctuate in a certain range and have an error of less than 0.3V with the final output signal.
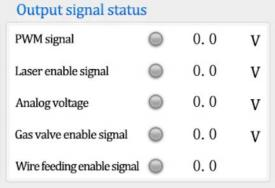
Figure 3.1-7 Monitoring page-Output signal status bar
③ Basic information of the equipment
Equipment authorization: click to encrypt the use time of the equipment. When the equipment is used for more than the set time, the authorization will be terminated and the system will stop working. Factory default is long-term effective, if you need encryption and decryption, please contact us for inquiry.
System version: three sets of numbers, the first group is the hardware version, the second group is the microcontroller program version, the third group is the touch screen version.

Figure 3.1-8 Monitoring page-Set up the basic information bar
④ power status
The real time power supply voltage and current of the device are shown. Due to the update of the algorithm, the data accuracy continues to indicate that there will be some differences in different versions of different versions, which is a normal phenomenon. Mainly through the power supply voltage to help the after-sales power supply troubleshooting.
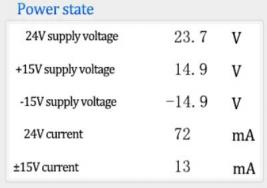
Figure 3.1-9 Monitoring page-Power status bar
⑤ communication status
"Communication status" indicates the communication between the touch screen and the motherboard. If not synchronized, check the screen cable.
"Anti-shake" is used to deal with poor contact with safe locks, which range from 0 to 300 ms. Click "Device authorization box" to set the parameter range on the password page as shown in Figure 3.9. The password is "ffffffaa300" where "ffffffaa" indicates the lock anti-shake parameter and cannot be changed. "300" means 300ms. The effect is that when the trigger signal is normal and the disconnection time of the safety lock signal is <300ms. Material welding used to deal with poor surface performance and unstable conductivity (e. g. rust) is usually set to 0.

Figure 3.1-10 Monitoring page-auxiliary status bar-ground lock anti-shake password
"Motor driver temperature" and "protective mirror temperature" represent the measured real-time temperature of the two parts. "Motor driver temperature" affects the motor swing performance of the environment. If the environment is poor, it will lead to the abnormal temperature increase, affect the laser scanning speed, and then lead to the decrease of weld quality. The lens temperature reflects the working state of the lens to help determine whether the lens is damaged.
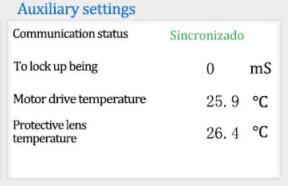
Figure 3.1-11 Monitoring Page-Auxiliary status bar
⑥ diagnose
Click the diagnostic button to enter the diagnostic interface. Use to measure whether the signal port has an actual output, usually the output value is consistent with the detection value. When inconsistent, the load is abnormal, such as when the laser does not light, through the single port with the laser monitoring software or multimeter measurement, the real reaction signal is emitted
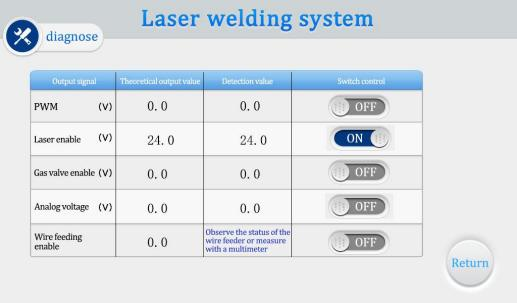
Figure 3.1-12 The diagnostic page
2. Cutting mode
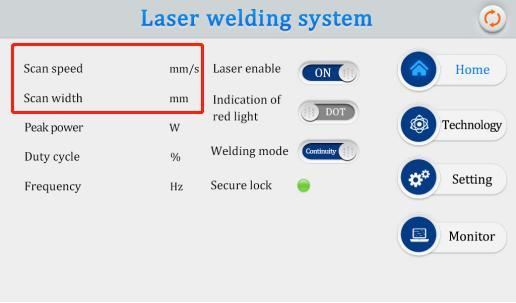
graph 3.2-1
[Scan width] is set to [0], which refers to the [copper mouth] for replacing cutting, which can be cut. [safe ground lock] needs to be ensured.
3. Cleaning mode

graph 3.3-1
① This interface can see the current process parameters (this page can not be modified process) and real-time alarm information.
② The default state is ON, indicating that the red light is LINE by default. When enabling is turned off, the enabling signal will not be sent to the laser and can be used to test the outlet function. Close the red light indicator, the motor stops swinging, and the red light is a point to adjust the center position.
③ Click on the upper right corner to switch to the cleaning mode.

graph 3.3-2
① The process interface contains the process parameters of debugging, click the box (red) to modify, click OK, and then save in the quick process, click import (modify-save-import).
② The scan frequency range is 10- 100 HZ, and the scan width range is 0 ^30mm.
(At the focusing lens F800, the maximum width is 130mm. At the focusing mirror
F150, the maximum width is 30mm).
③ Peak power should be less than or equal to the parameter page laser power.
(If the laser power is 1000W, then this value is not higher than 1000).
④ Duty cycle range 0 to 100 (default 100, usually not changed).
⑤ The pulse frequency range is recommended from 5-5000Hz (default 2000, usually no modification).
⑥ Click the "Help" button on the top right to get more relevant parameters explained.
⑦ After modifying the parameters, you can see whether the import is successful on the home page.
⑧ Reference process, can be used in the small program process reference.
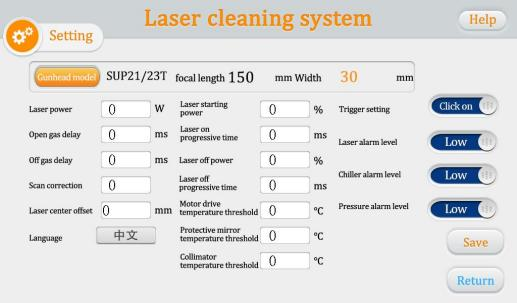
graph 3.3-3
Password: 123456
① The laser power is the power of the used laser, please fill in correctly.
② The default gas delay default 200ms, range 200ms-3000ms.
③ From N1% of process power to 100%; from 100% of process power to N2;
(as shown in the figure below).
The higher the process power, the lower the recommended open light power. Open light power usually should not exceed 50%, too high open light power will greatly reduce the service life of the lens.
④ The maximum temperature alarm valve value is 65℃. When the value is set to 0, the temperature alarm is not detected.
⑤ Scan correction coefficient range 0.01~4, coefficient target line width / measured line width: the default is 1.0.
⑥ Laser center offset: The cleaning mode only shows the current offset. If you need to adjust the center, please cut back to the welding mode, and replace the F150 aggregation mirror to ensure accuracy.
⑦ The pressure / water cooler / laser alarm level signal is low level by default. When this alarm signal is used, if the external pressure alarm is installed, it will be changed to high level, otherwise there will be abnormal alarm will occur, and other alarm signals should be the same.
⑧ Click the "Language" button, you can switch to other languages in the language selection bar. Currently, the standard version supports 19 languages. Please contact us if necessary.
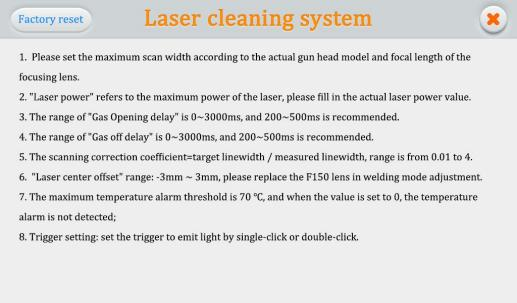
graph 3.3-5
⑨ Click "Help" in the upper right corner to enter the help page of the Settings page. Long press "Restore factory Settings" to restore the setting parameters to the factory state. Long press "Save as factory settings" to modify the factory parameters.
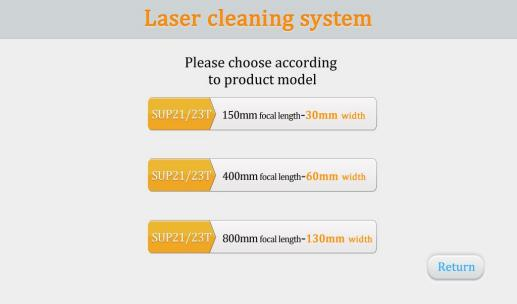
graph 3.3-6
⑩ Click "Gun size number" to focus the mirror to select the maximum scanning width.

graph 3.4-1
This page displays the status of each signal and the equipment information
Laser trigger signal: when the trigger is pulled, this state changes from gray to green
Laser / water cooler / air pressure alarm signal: monitor the actual measured level, corresponding to the alarm level of the setting page. Gray is high (also high when suspended) and green is low (port ground is also low).
Output signal status: display the actual measured output signal value. In the middle is the output signal indicator light, when the signal output, from gray to green.
Equipment authorization: the equipment can be authorized and encrypted. When the equipment is used beyond the set time, the interface displays [authorization termination], and the light cannot work.
System version: three sets of numbers, the first group is hardware version, the second group is microcontroller software version, the third group is touch screen software version. Please keep the parts as the factory version, and the version mismatch may lead to improper operation.
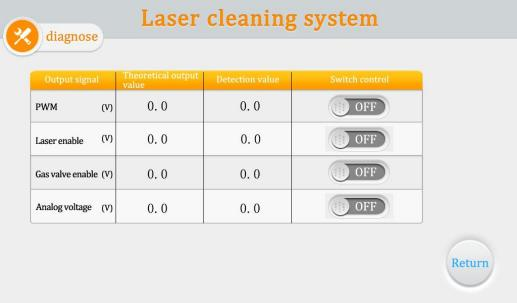
graph 3.4-2
Click the Diagnostic-button to enter the diagnostic page. Under this page, the laser will not emit light, you can control the independent output "PWM", "laser enabling", "air valve enabling" and "analog amount" through the "switch control", and compare the detection value to judge whether the theoretical value of the control box function is normal.
4. Welding seam cleaning
Change the [AS-2.0D] copper nozzle in welding mode. For the specific process, see the wechat small program demonstration video
4. Maintenance
Maintenance and replacement method of related lenses:
① Before operation, please clean your hands and dry them, and then wipe them with cotton and alcohol again.
② Open the protective mirror in a relatively dust-free place, focus the mirror compartment cover, pull out the lens bracket, do a good job of protection (beautiful paper cover), check the protective lens, if there is an obvious burning point on the lens surface, should be directly replaced.
③ Then check the white storage seal ring under the lens.(If the storage sealing ring cannot be used, it must be replaced immediately.
④ Wipe the warehouse mouth and the inside of the warehouse cover with a cotton ball dipped in alcohol, quickly insert the protective lens bracket into the protective mirror compartment, and lock the screws.
5. Common exception handling
5.1 warning of laser/watercooler/air pressure alarm
① If the above alarm does not use the alarm signal, please change the alarm level of the screen setting page.
② If the alarm appears in the above alarm signal, check whether the alarm or the high and low level of the alarm signal is set correctly.
5.2 screen not bright/click not responsive
① The screen is not bright, make sure that the controller is electrified. Check whether the controller and the four-core wire of the screen are connected correctly, and whether the voltage of the 1st foot and the 4th foot 24V is normal.
② If not clicked in normal use, check whether the temperature of the machine is too high.
③ Click unable to input, check whether the wiring between the controller and the screen is correct, and whether the second and third feet are normal. See 2.1.2 controller display end for details.
④ Newly installed equipment click no reaction may be the system version does not match, use the SD card to rebrush the program can be, please ask us for the specific version.
5.3 No light
① Check whether there is an alarm prompt on the home page, and whether the laser enabling system is ON;
② Check whether the trigger signal and safety lock signal of the monitoring page are displayed in green during welding;
③ Check whether the PWM, laser enabling and analog output of the monitoring page are normal during welding.
If the above conditions are normal, check the laser for abnormal alarm.
Example: the air supply wire but not the light, for the laser fault or laser wiring error. If neither air nor wire supply, the input signal may be missing, see: 2.1.3 Controller signal interface 1.
5.4 suddenly stop producing light during processing
please check it
Display whether the safety ground lock of the monitoring interface is normal.
Whether the other alarms appear normal.
Whether the authorization is terminated.
appendix
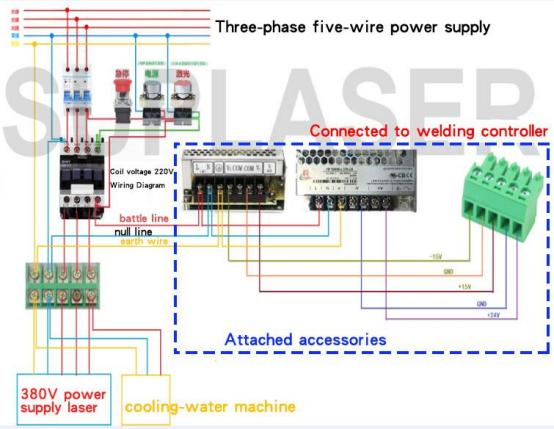
Laser welding machine three-phase power supply connection reference:
Note: Two-phase or three-phase electricity depends on the power supply required by the laser and the chiller, rather than the amount of wire harness.